
Pranayama Standing Deep Breathing: The First Posture of Hot 26&2.
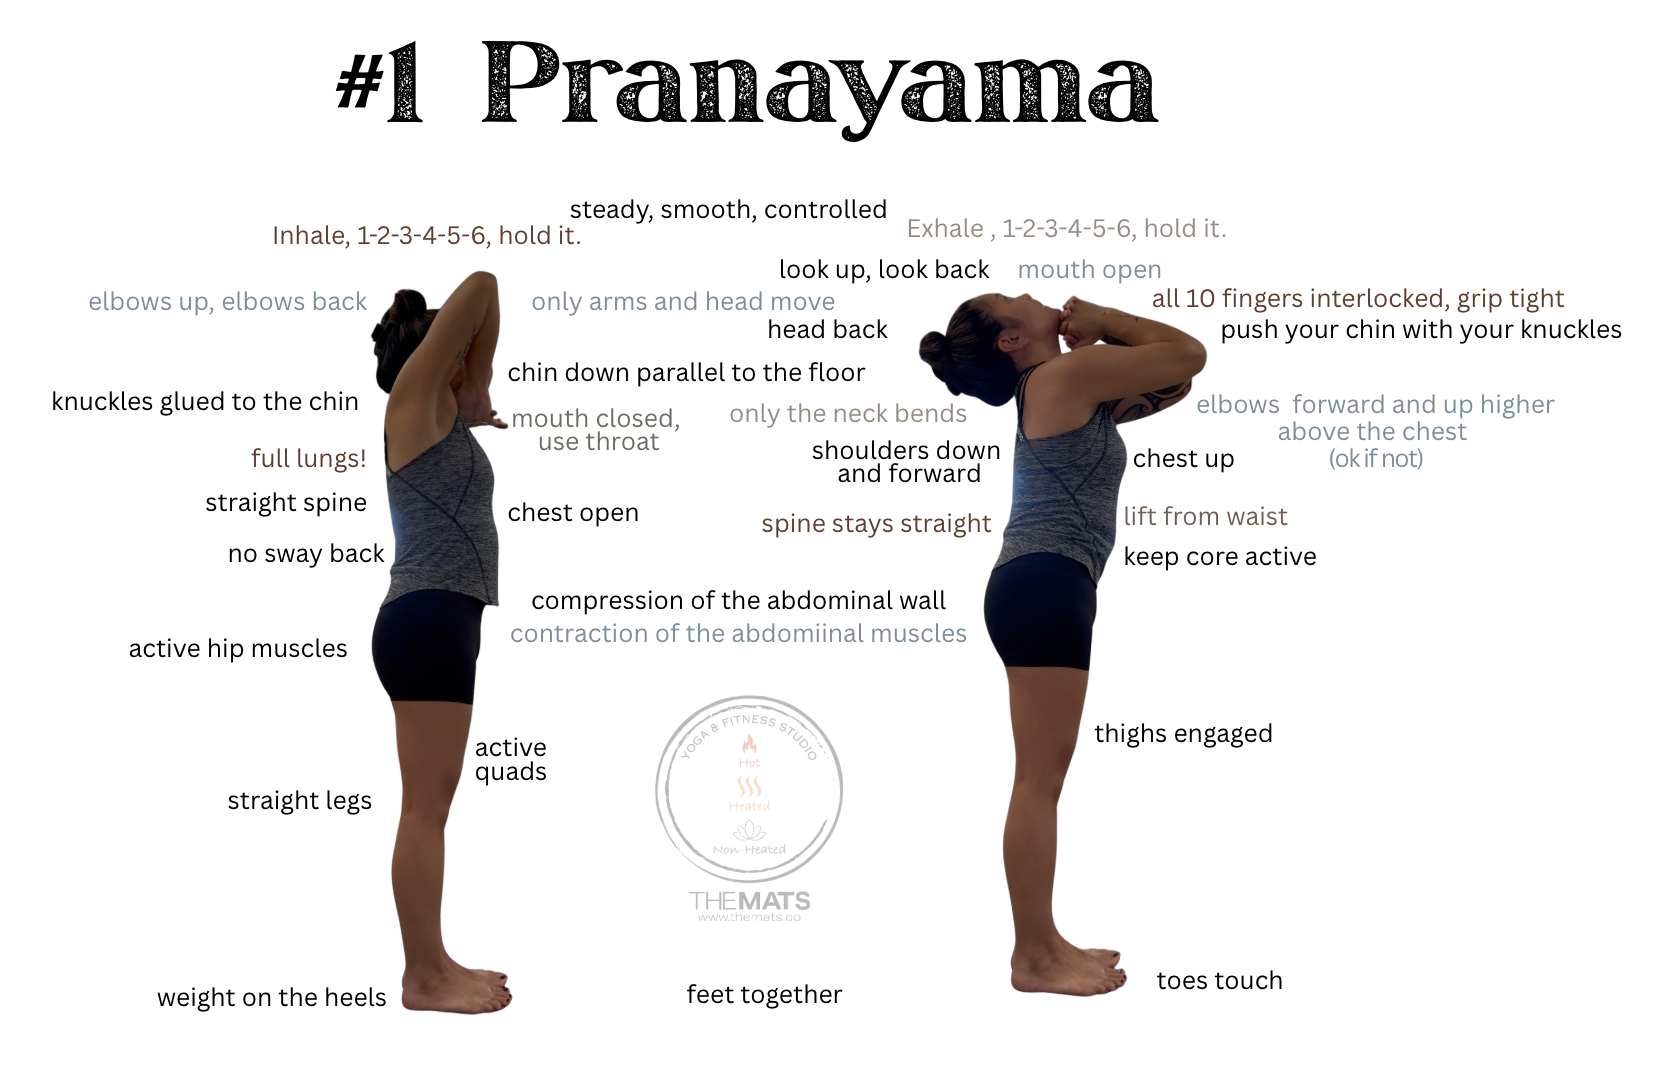
Stephenie Francisco demonstrating Pranayama, 2026
Our Hot 26and2 practice begins with Pranayama Standing Deep Breathing, traditionally numbered as the first posture in the 26-posture sequence.
Although Pranayama is primarily a breathing exercise, it is included as posture number one in the traditional sequence we teach. The practice concludes with Kapalabhati in Vajrasana, also known as Blowing in Firm, as posture number 26.
Hot 26and2 is based on the traditional sequence commonly associated with Bikram Yoga, also known as the Original Hot Yoga. However, our class is called Hot 26and2.
Pranayama is not simply something we do before the yoga begins.
It is where the practice begins.
What Is Pranayama Standing Deep Breathing?
Pranayama Standing Deep Breathing combines slow, controlled breathing with coordinated movement through the arms, shoulders, rib cage, neck, and spine.
The exercise is performed while standing. The fingers are interlaced underneath the chin, and the elbows move with each inhalation and exhalation.
Students inhale slowly through the nose and exhale through the mouth while creating a controlled breath sound from the throat.
The traditional dialogue provides a specific rhythm, technique, and direction. However, the purpose is not to force every student’s body into an identical shape. The dialogue gives students a clear path to follow while they learn how to breathe, concentrate, and work safely with their own bodies.
Why Does Hot 26and2 Begin With Pranayama?
Pranayama introduces many of the skills students will use throughout the entire Hot 26and2 class.
It teaches students to:
Listen carefully to the teacher’s instructions.
Coordinate movement with the breath.
Focus their attention.
Notice areas of tightness or restriction.
Remain calm while experiencing effort.
Begin moving the shoulders, chest, rib cage, neck, and spine.
Become aware of how they are breathing that day.
Before balancing, stretching, twisting, or backbending, students begin with something they do every day: breathing.
The difference is that during Pranayama, we learn to breathe with intention, concentration, and awareness.
Benefits of Pranayama Breathing
Pranayama Standing Deep Breathing may support:
Breath awareness
Many people breathe without noticing whether the breath is shallow, rushed, held, or restricted.
Pranayama asks the student to become conscious of the entire breathing cycle. Students learn to notice the inhalation, the exhalation, and the connection between breathing and movement.
Concentration
The breathing count, arm movement, and verbal instructions require focus.
Students cannot always control what is happening around them, but they can practice bringing their attention back to their breath.
Mind-body connection
The exercise encourages students to notice how the breath affects the chest, ribs, shoulders, abdomen, neck, and spine.
Over time, students may become more aware of where they create unnecessary tension.
Gentle movement through the upper body
The coordinated movement can begin to mobilize the shoulders, upper back, chest, and rib cage.
However, the movement should remain controlled. A larger movement is not automatically a better movement.
Preparation for the class
The breathing exercise begins establishing the steady effort, concentration, patience, and discipline used throughout the rest of the traditional series.
It also gives the student an opportunity to observe how the body feels before moving into more demanding postures.
How to Practice Pranayama Standing Deep Breathing
1. Establish your foundation
Stand with your feet together in the traditional position.
If standing with the feet together affects your balance, you may separate the feet slightly. Stability is more important than forcing the feet together while feeling unsteady.
Distribute your weight as evenly as you comfortably can.
Stand tall, but do not make the body rigid.
2. Interlace your fingers
Interlace all ten fingers and place your knuckles underneath your chin.
Your fingers should remain connected, but your grip does not need to be excessively tight.
Keep the hands in contact with the chin without forcing the head upward or backward.
3. Begin the inhalation
Inhale slowly through your nose.
As you inhale:
Lift your elbows gradually.
Allow the rib cage to expand.
Keep the spine long.
Keep the chin in contact with the hands.
Try to keep the shoulders away from the ears.
Breathe smoothly rather than inhaling suddenly.
The traditional breathing count may feel long for a beginner. Do not panic or gasp to keep up with the teacher.
Take the deepest comfortable breath available to you that day.
4. Begin the exhalation
Exhale slowly through your mouth, creating the traditional breath sound from the throat.
As you exhale:
Bring your elbows forward toward each other.
Allow the rib cage to draw inward.
Gently engage the abdomen.
Lift the chin gradually.
Move the head only as far as the neck comfortably allows.
Continue standing tall instead of collapsing through the lower back.
The head and neck movement should be controlled. The hands should not pull the head backward.
5. Continue with the rhythm
Repeat the breathing cycle without rushing.
Try to make the inhalation and exhalation smooth and steady. Allow the movement of the elbows to follow the breath rather than moving the arms faster than you can breathe.
The goal is not to make the biggest possible movement.
The goal is to develop control, concentration, breath awareness, and patience.
What Does “Trust the Dialogue” Mean?
The traditional Bikram Yoga dialogue gives clear instructions about breathing, alignment, timing, and direction.
Trusting the dialogue means allowing the instructions to guide you through the posture instead of constantly changing the posture based only on habit, fear, frustration, or what another student looks like.
The dialogue gives the class structure and purpose.
However, trusting the dialogue does not mean ignoring pain, dizziness, numbness, previous injuries, or physical limitations.
A teacher can observe the outside of your body, but the teacher cannot feel what is happening inside your neck, shoulders, spine, joints, or nervous system.
The teacher may not know about every injury, surgery, diagnosis, asymmetry, or restriction unless you communicate it.
The best practice is to combine both:
Trust the dialogue for direction, and trust your body for information.
The posture is the guide. Your body tells you how much of that posture is appropriate today.
Modifications for a Tight Neck
The traditional expression includes lifting the chin and moving the head backward during the exhalation.
For students with neck tightness, discomfort, previous injuries, headaches, dizziness, or limited cervical mobility, this movement may need to be reduced.
Possible modifications include:
Keep the head closer to neutral.
Look forward instead of backward.
Lift the chin only slightly.
Move the elbows while keeping the neck still.
Keep the knuckles underneath the chin without pushing upward.
Reduce the range of motion.
Focus on lengthening the neck rather than compressing it.
A student does not need to drop the head all the way back to receive the benefits of practicing the breathing exercise.
The movement should never create sharp pain, pinching, tingling, numbness, visual changes, or dizziness.
Modifications for Tight Shoulders
Students with tight shoulders may find it difficult to lift the elbows high during the inhalation or bring the elbows fully together during the exhalation.
It is not necessary to force the shoulders into a range of motion they do not yet have.
Possible modifications include:
Keep the elbows lower.
Use a smaller arm movement.
Allow the elbows to remain slightly apart.
Relax the grip of the hands.
Keep the shoulders away from the ears.
Reduce the movement if the shoulders pinch.
Focus more on the breathing than on the height of the elbows.
The elbows may not lift very high during a student’s first class. That is okay.
Mobility develops through patient and consistent practice—not by forcing the joint beyond its current range.
Modifications for Scoliosis or Spinal Limitations
Scoliosis can affect the alignment of the spine, shoulders, hips, and rib cage. It may also affect how the breath expands through each side of the torso.
A student with scoliosis may notice that:
One shoulder sits higher than the other.
One elbow moves differently.
One side of the rib cage expands more easily.
Standing with the feet together feels unstable.
The spine does not appear visually straight.
The neck or upper back has a different range of motion on each side.
The student should not be pressured to make both sides look identical.
Helpful modifications may include:
Separate the feet slightly for balance.
Keep the spine and head closer to neutral.
Reduce the movement of the elbows.
Allow the shoulders to move differently.
Avoid forcing the chest forward.
Avoid exaggerating a backbend.
Focus on creating a smooth breath.
Observe differences between the two sides without judging them.
Use a wall or stable support when appropriate.
The purpose of the posture is not to force the spine into perfect visual symmetry.
Alignment instructions can help organize and guide the body, but they should be applied according to the student’s individual structure and medical history.
Students with significant scoliosis, spinal fusion, nerve symptoms, recent surgery, or persistent pain should seek guidance from an appropriate health care professional.
Advice for Beginners and First-Time Students
Pranayama can feel surprisingly challenging during a first Hot 26+2 class.
A beginner is learning several things at once:
How to stand.
How to position the hands.
How to move the elbows.
How to breathe through the nose.
How to exhale through the mouth.
How to follow the count.
How to respond to the heat.
How to listen to the dialogue.
How to observe the body without panicking or forcing.
It is normal not to perform every part perfectly.
Beginners may:
Take a shorter inhalation.
Take a shorter exhalation.
Use less arm movement.
Keep the head neutral.
Stand with the feet slightly apart.
Pause and return to normal breathing.
Watch one round before joining again.
Take time to understand the technique.
There is no need to become frustrated because the posture does not look complete immediately.
The first goal is to learn.
The next goal is to practice consistently.
The depth and expression of the posture can develop over time.
The Difference Between Discomfort and Pain
Yoga may include effort, stretching sensations, heat, muscle fatigue, and unfamiliar movements.
However, students should learn to recognize the difference between productive effort and a warning sign.
Students should reduce the movement or stop if they experience:
Sharp or sudden pain.
Pinching in the neck or shoulders.
Tingling or numbness.
Feeling faint.
Visual disturbances.
Chest pain.
Severe shortness of breath.
Confusion.
Unusual weakness.
A sensation that feels unsafe or alarming.
Listening to the body is not weakness.
It is part of developing body awareness.
Consistency Is More Important Than Force
Flexibility and mobility usually take time.
A tight neck may not release after one class. Shoulders may take weeks or months to move more freely. A beginner may need repeated practice before the breathing rhythm begins to feel natural.
Progress can look different for every student.
Progress may mean:
Breathing more slowly.
Feeling calmer in the room.
Lifting the elbows slightly higher.
Reducing tension in the jaw.
Standing with better balance.
Understanding the dialogue more clearly.
Recognizing when to modify.
Staying focused for one more round.
Accepting the body without forcing it.
The body often responds better to repetition, patience, and consistency than to aggression.
You do not have to force something to happen today just because you hope to achieve it eventually.
A Teacher’s Role
A teacher’s responsibility is to guide, educate, observe, and create a space where students can practice safely.
The teacher can explain:
How the posture is traditionally performed.
Why the posture is included in the sequence.
What alignment the student is working toward.
How the breath and movement connect.
What modifications may be appropriate.
However, teachers must also remember that they cannot always know what is happening inside a student’s body.
Two students may look similar from the outside while experiencing completely different sensations internally.
This is why communication matters.
Students should feel comfortable telling the teacher about injuries, pregnancy, surgeries, dizziness, scoliosis, chronic pain, or other relevant concerns.
Teachers should guide students toward the posture without using shame, fear, or pressure.
Final Thoughts
Pranayama Standing Deep Breathing is posture number one in the traditional Bikram Yoga series.
It begins the practice by teaching students how to breathe, listen, concentrate, and connect movement with awareness.
The dialogue gives us a trusted structure. The posture gives us a direction. Consistent practice gives the body time to learn and change.
But yoga should never require a student to disconnect from their own body.
Do the best you can with the body you have today.
Listen to the dialogue.
Respect the posture.
Notice your breath.
And never force your body simply to make the posture look complete.
The practice is not about achieving everything immediately.
It is about returning, learning, breathing, and progressing one class at a time.
This article is intended for general education and yoga instruction. It is not a substitute for medical advice, diagnosis, physical therapy, or individualized treatment.
Experience Hot 26and2 at The MATS Daly City
Ready to experience the practice for yourself? Visit The MATS in Daly City and explore our welcoming variety of movement classes for different experience levels.
Our schedule includes Hot 26and2, hot yoga, warm and heated yoga, non-heated yoga, meditation, and fitness classes designed to help you build strength, improve flexibility, reduce stress, and feel more connected to your body.
Whether you are completely new to yoga or returning to a consistent practice, our instructors will guide you while encouraging you to listen to your body and move at your own pace.
Come practice with us at The MATS Daly City and find the class that feels right for you. View our class schedule and reserve your spot today.
